Tiledesk Developer Hub
WebsiteCommunityTutorialsGet started
  • Introduction
  • Community
  • Ask for Support
  • Public Roadmap and Changelog
  • Tutorials
  • Widget
    • Widget SDK
    • Javascript API: Methods
    • Javascript API: Attributes
    • Javascript API: Listeners/Events
    • Widget Authentication
    • Widget Angular integration
    • Widget React integration
    • Widget for Android with WebView
    • Widget for iOS with WKWebView
    • Widget for Flutter with WebView
    • Widget for React with WebView
    • Widget for Wix Website platform
    • Tutorials
      • Hide widget
      • Show/Hide widget programmatically
      • Force widget loading without user interaction
      • Mobile positioning
      • Custom size (width/height)
      • Installing widget on selected pages
    • Conversation Embedded Apps
      • Payment App Tutorial
      • Prechat form App Tutorial
    • Advanced
      • Preset the Widget on a specific Department
      • Authentication Flow
      • Widget protocol specs
      • Prechat Form JSON specs
      • Prevent multiple conversations
      • Old versions
        • Web SDK v4
  • External Chatbot
    • Introduction
    • Hello World tutorial
    • Chatbot to Human handoff
    • Send Text Buttons
    • Advanced Tutorials
      • Introduction
      • Tutorial 1 - Dialogflow as external chatbot
      • Tutorial 2 - Buttons and images
      • Tutorial 3 - Automatic human handoff with fallback intent
      • Tutorial 4 - Explicit Human handoff with user intent
      • Tutorial 5 - Gracefully handling operating hours during handoff
      • Generate Dialogflow Google Credentials file
    • Rasa tutorials
      • Rasa Tutorial 1 - Rasa as external chatbot
  • Resolution bot
    • Introduction
    • Quickstart
    • Webhook service
    • Rich messages
    • Tutorials
      • Chatbot chooser (multilanguage)
      • Department chooser
      • Order info (webhook)
  • APIs
    • REST APIs
      • Introduction
      • Authentication
      • Requests
      • Leads
      • Messages
      • Activities
      • Projects
      • Team
      • User
      • Analytics
      • Canned responses
      • Tags
      • Events
      • Jwt
      • Labels
      • Images
      • Files
      • Segments
      • Chatbots
      • Knowledge Bases
        • Knowledge Base
        • Contents
        • Question & Answer
      • Management Api
        • Departments
        • Groups
    • NodeJS SDK
    • Webhooks
      • Subscriptions
    • Conversation Messages APIs tips
    • Realtime API
    • JWT Authentication
      • JWT Custom authentication Tutorial
    • Tutorials
      • REST API
        • Sending and receiving messages with Tiledesk APIs
        • PHP Tiledesk REST API example
        • Import multiple messages into Tiledesk using REST APIs from third party app
      • Webhooks
        • Custom Request assignment
        • Request transcript on close
  • Apps
    • Build Custom App - Quick start
    • External Channels integration flow diagram
    • Telegram integration tutorial
  • Dashboard & AgentChat SDK
    • Dashboard SDK
    • Agent Chat SDK
  • Architecture
    • Architecture overview
    • Components list
    • Bot Design diagram
    • Multi Channel Message Flow
  • Installation
    • Installation
    • Running Tiledesk using Docker Compose
    • Running Tiledesk with Kubernetes using Helm
    • Choosing Hardware
  • Configuration
    • Chat21 channel configuration
    • Email parameters and templates configuration
    • Configure the logging system
Powered by GitBook
On this page
  • Tiledesk External Chatbot - Send Buttons
  • Widget native protocol
  • Microlanguage

Was this helpful?

  1. External Chatbot

Send Text Buttons

PreviousChatbot to Human handoffNextAdvanced Tutorials

Last updated 1 year ago

Was this helpful?

Tiledesk External Chatbot - Send Buttons

The Tiledesk native Widget supports many special messages that go beyond simple text sent back to the user.

A chatbot can also reply with images, videos, maps, buttons or even with a message embedding an entire interactive app.

External chatbots can benefit of all of these features, and sending a rich message to the client is very easy. You can use two ways to send rich messages:

  1. The Widget's native

  2. or the Tiledesk chatbot's

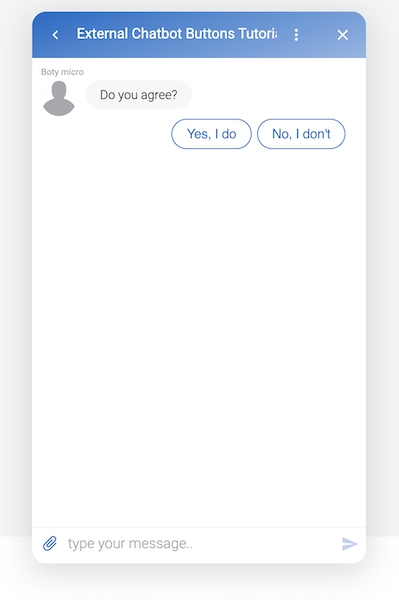
In this tutorial we'll send back a message with a couple of text buttons to the widget
image

Widget native protocol

const express = require('express');
const bodyParser = require('body-parser');
const { TiledeskChatbotClient } = require('@tiledesk/tiledesk-chatbot-client');

const app = express();
app.use(bodyParser.json());

app.get('/', (req, res) => {
  res.send("Tiledesk External-Chatbot Buttons example");
});

app.post('/bot', (req, res) => {
  res.status(200).send({"success":true});
  const tdclient = 
    new TiledeskChatbotClient(
      {
        request: req,
        APIKEY: '__APIKEY__'
      });
  if (tdclient.text === "\\start") {
    tdclient.sendMessage(
      {
        text: 'Do yiou agree?',
        attributes: {
          attachment: {
            type:"template",
            buttons: [
              {
                  type: "text",
                  value: "Yes, I do"
              },
              {
                  type: "text",
                  value: "No, I don't"
              }
            ]
          }
        }
      }
    );
  }
  else {
    tdclient.sendMessage({text: 'Not trained for this'});
  }
});

app.listen(3000, () => {
  console.log('server started');
});

Microlanguage

Microlanguage is a special tag-based-language, specifically designed to allow chatbot developers to use advanced chatbot features without programming skills.

We just added another endpoint in the same index.js that you can use to understand how to use microlanguage to send buttons back to the widget.

app.post('/bot-micro', (req, res) => {
  res.status(200).send({"success":true});
  const tdclient = 
    new TiledeskChatbotClient(
      {
        request: req,
        APIKEY: '__APIKEY__'
      });
  if (tdclient.text === "\\start") {
    tdclient.sendMessage(
      {
        text: "Do you agree?\n* Yes, I do\n* No, I don't",
        attributes: {
          microlanguage: true
        }
      }
    );
  }
  else {
    tdclient.sendMessage({text: 'Not trained for this'});
  }
});

As you can see you just have to add the buttons with the same synthax you use for lists in markdown. The microlanguage automatically converts the items in buttons.

The is a special JSON format that you can use to specify the message content, type (ex. 'image' or 'text'), attachments or other features.

In the next example we'll specify how to send a couple of text buttons to the Widget to let the user choose between a couple of options. If you want to know more about text buttons and why they are useful in chatbot programming you can read in the Tiledesk's Knowledge Base.

We'll use the code that you can find in the Widget JSON protocol, at the paragraph

You can find the full index.js code of the Node.js application on the for this tutorial:

Widget native protocol
Advanced chatbot styling: buttons
Text message with reply buttons
repl.it project
JSON Protocol
Microlanguage